Description
When the app is running in the background, Agora chat SDK maintains a persistent connection to the chat server through a background service by default. However, in order to solve the problem of poor standby performance, Android gradually banned the operation of app-level background services with the upgrade of the Android version. Therefore, some Android systems with higher versions may not receive messages. In order to improve the receiving rate of messages, our SDK has added support for third-party push services, including Xiaomi push, Huawei push, OPPO push, Meizu push, VIVO push, Google FCM push.
At present, the main implementations of Xiaomi, Meizu, OPPO, and VIVO push are integrated in Agora chat SDK which try to provide developers with the simplest form of integrated three-party push. The implementation of push with Huawei and Google FCM are still in the Demo layer and needs to be integrated by the developer. For details, please refer to Agora’s Google FCM and Huawei’s push integration document.
Use conditions of each push:
-
Google FCM: Google Play Service and a network that can connect to Google servers are required
-
Xiaomi push: available on Xiaomi device
-
Huawei push: available on Huawei device
-
Meizu push: available on Meizu device
-
OPPO push: available on OPPO device
-
VIVO push: available on VIVO device
-
The SDK will check the push support status of the device following this order to
-
If the third-party push is not set or the conditions for using the third-party push are not met, Agora chat SDK will use some methods to keep the persistent connection with the chat server to ensure timely delivery of messages
Recommendation: If your App has overseas usage scenarios, it is recommended to enable FCM push. Due to different push conditions, it is recommended to enable both Xiaomi and Huawei push.
Message push process:

- Determine what kind of push the device supports, (the app is configured with third-party push and meets the conditions to use the push)
- get the push token according to the integrated third-party push SDK
- Upload the name of the certificate (the chat server will determine which push channel to use) and push the token to the chat server
- When sending a message to a device, the chat server will first determine whether the target device is online. If the target device is not online, please determine which push channel the target device uses (according to the name of the certificate uploaded by the target device). Use this push channel to push messages to the target device through a third-party push server
The capabilities that the chat server should have:
-
Have the capability to send push messages to your app
- The developer configures the push certificate of the App through the developer console, and the push certificate will require the name of the certificate (or appKey). The certificate name is the only condition used by the chat server to determine which push channel the target device uses, so ‘‘the certificate name must be the same as the certificate name’’ uploaded by the Android terminal device
- Push token individual to the corresponding terminal Android device
- Need to be reported by the Android device
- Which push channel does the push token belong to?
- Need to be reported by the Android device
Things to do for Android devices:
- Determine which push channel the current device supports
- Get push token by integrating third-party push SDK
- Upload the certificate name (note that it is the same as the certificate name configured through the develp console) and push the token to the chat server (this step must be after the successful login of the chat SDK)
Configure push interface
The interface of the developer configuration push :
PushConfig.Builder builder = new PushConfig.Builder(context);
        builder.enableVivoPush() // The information about the push certificate is configured in AndroidManifest.xml
                .enableMeiZuPush(String appId, String appKey)
                .enableMiPush(String appId, String appKey)
                .enableOppoPush(String appKey, String appSecret)
                .enableHWPush() //Developers need to call this method to enable Huawei push
                .enableFCM(String senderId); //Developers need to call this method to enable FCM push

ChatOptions options = new ChatOptions();
options.setPushConfig(builder.build());
The developer needs to replace the relevant information in the above configuration with the configuration of each platform applied by the developer. It is recommended that developers should configure as many third-party pushes as possible to ensure the arrival rate of offline messages.
Please note: Developers need to configure relevant push information before SDK initialization.
Developers can call the following code to listen push related events (only support Xiaomi, Meizu, OPPO, VIVO):
PushHelper.getInstance().setPushListener(new PushListener() {
     @Override
     public void onError(PushHelper pushType, long errorCode) {
         EMLog.e("PushClient", "Push client occur a error: "+ pushType +"-"+ errorCode);
// TODO: The developer will receive the error message of the push in this callback. For the error code of each push type, developer can go to the official website of each push platform to check the reason of the error.
     }

     @Override
     public boolean isSupportPush(PushHelper pushType, PushConfig pushConfig) {
         return super.isSupportPush(pushType, pushConfig);
// TODO: Developers can rewrite this method to control whether the device supports a specific push judgment.
     }
});
About confusion
- If you have turned on confusion in your project, please add the following rules to your confusion rules:
    # chat push
    -dontwarn io.agora.push.***
    -keep class io.agora.push.*** {*;}
- About the confusion rules of third-party push integrated in Agora Push, you can check it on each developer push platform
Google FCM push integration
Description
- The use of FCM is mainly designed for overseas users;
- FCM requires the device to have Google Play services, Google Play Store and A network that can connect to Google servers.
Server
-
Log in to Firebase Management Background
-
Click Add Project on the Firebase welcome interface, input the corresponding content and click Create Project.
-
In the Firebase welcome interface, select Add Firebase to your Android App.
-
After selecting the application type, you need to input the package name, project nickname, SHA-1, and then click Register App.
-
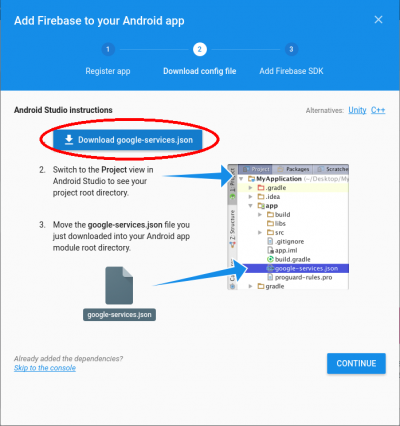
Enter the guide page, as shown in the figure below, click the button to download the google-services.json file to the local. Pay attention to where the json file is placed in the Android project.
- Skip the guide page, click on the Cloud Messaging tab page, copy Server Key and Sender ID
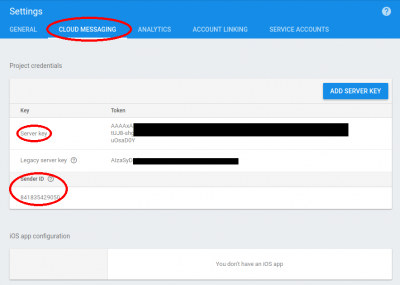
- Log in to Developer console, home page-application list-view application-instant messaging-message push-add push certificate, the name of the certificate is required to fill in the copy above Sender ID, fill in the Server Key copied above for certificate key.
Mobile
- Add Google Play Service related dependency libraries
Used to check whether the device supports Google FCM push, This step does not exist in the official FCM integration document. Due to the special domestic use environment, we have added this configuration for auxiliary detection.
Addconfiguration of compile'com.google.android.gms:play-services-base:11.4.0' to the corresponding build.gradle file of the project. As follows:
    dependencies {
        // add this line
        compile'com.google.android.gms:play-services-base:11.4.0'
    }
Note: version of Google push related dependency library must correspond (in this document are: 11.4.0), otherwise there may be a class conflict error.
-
Add FCM related library file configuration in project-level build.gradle:
buildscript { dependencies { // add this line classpath'com.google.gms:google-services:3.1.1' } } allprojects { repositories { // add this line maven {url'https://maven.google.com'} } } -
Add FCM related library file configuration in app-level build.gradle: Push
 dependencies {
 // Add this line, Google Firebase cloud messaging
     compile'com.google.firebase:firebase-messaging:11.4.0'
 }

 // This line is added at the end of the file
 apply plugin:'com.google.gms.google-services'
Note: version of Google push related dependency library must correspond (in this document are: 11.4.0), otherwise there may be a class conflict error.
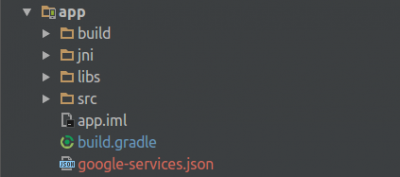
- Place the downloaded google-services.json in the root directory of app-level
- Implement a custom service inherited from FirebaseInstanceIdService. This class is used to listen to the creation and update of FCM tokens. One device corresponds to one FCM token, which is used by the server to push messages to the device. Therefore, the token needs to be uploaded to the chat server in time after it is created or updated.
Custom FirebaseInstanceIdService:
public class FCMTokenRefreshService extends FirebaseInstanceIdService {
    private static final String TAG = "FCMTokenRefreshService";

    @Override
    public void onTokenRefresh() {
        super.onTokenRefresh();
        String token = FirebaseInstanceId.getInstance().getToken();
        Log.i(TAG, "onTokenRefresh: "+ token);
        // Important, send the fcm token to the server
        ChatClient.getInstance().sendFCMTokenToServer(token);
    }
}
AndroidManifest.xml:
<service android:name=".fcm.FCMTokenRefreshService">
    <intent-filter>
        <action android:name="com.google.firebase.INSTANCE_ID_EVENT" />
    </intent-filter>
</service>
- Implement a custom service inherited from FirebaseMessagingService. This class is used by FCM to receive application push messages in the background. And register the service to AndroidManifest.xml.
Custom FirebaseMessagingService:
public class FCMMSGService extends FirebaseMessagingService {
    private static final String TAG = "FCMMSGService";

    @Override
    public void onMessageReceived(RemoteMessage remoteMessage) {
        super.onMessageReceived(remoteMessage);
        if (remoteMessage.getData().size()> 0) {
            String message = remoteMessage.getData().get("alert");
            Log.i(TAG, "onMessageReceived: "+ message);
        }
    }
}
AndroidManifest.xml:
<service android:name=".fcm.FCMMSGService">
    <intent-filter>
        <action android:name="com.google.firebase.MESSAGING_EVENT" />
    </intent-filter>
</service>
-
From the
ChatOptions#setUseFCM(true)interface setting to allow the use of FCM push. The SDK will check the FCM push conditions and use FCM push if the FCM push conditions are met. For interface usage, please refer to DemoHelper in Demo. -
Enable FCM push
    PushConfig.Builder builder = new PushConfig.Builder(context);
    builder.enableFCM(String senderId);
    options.setPushConfig(builder.build());
Push service test
In order to ensure the successful integration of the push service, the test can be done following steps below,
- Run the app and log in
- Kill the app process (to end the process by sliding the Android task list, rather than pressing the Home button to let the app enter the background; `Through Settings->App->Forcibly stop and end the app process, the app cannot receive FCM pushes, please refer to Google for details.)
- Send a message to the login account, and the app will receive the message delivered through the push service
Huawei HMS push integration
Create a Huawei application
The first is to go to the Huawei developer background to create an application and turn on push Service, and upload the corresponding certificate fingerprint. For details, please refer to the official introduction of Huawei: Huawei HMS Message Push Service Integration
Upload push certificate
After the registration is complete, you need to upload the push certificate in Developer Console, select your application—>Push certificate—>Huawei—>Add a new certificate , And then enter the APPID, SecretKeyand and the package name of the program in the application information you created in Huawei Developer Console ;
Enable Huawei push
PushConfig.Builder builder = new PushConfig.Builder(context);
builder.enableHWPush();
options.setPushConfig(builder.build());
Huawei push corner mark
The application entry activity needs to be set in the message extension. For example, the chat demo is io.agora.chatdemo.ui.SplashActivity
// Set custom push notification
JSONObject extObject = new JSONObject();
try {
    extObject.put("em_huawei_push_badge_class", "io.agora.chatdemo.ui.SplashActivity");
} catch (JSONException e) {
    e.printStackTrace();
}
// Set the push extension to the message
message.setAttribute("em_apns_ext", extObject);
Refer to Huawei official document
Huawei 4.0 push integration
From Huawei EMUI of version 10.0, Huawei Push has divided the notification message intelligence into two levels: general and important. Huawei notification message intelligent classification
note:
To use Huawei Push on EMUI 10, you need to upgrade to Huawei 4.0 Push, and contact us to configure a push interface with importance notification message level for your certificate.
You can refer to latest demo to integrate Huawei push of version 4.0:
-
Copy the “agconnect-services.json” file under the Huawei push background project application to the application-level root directory
-
Configure the following in build.gradle in the project-level root directory
allprojects { repositories { google() jcenter() maven {url'https://developer.huawei.com/repo/'} } } buildscript { repositories { google() jcenter() maven {url'https://developer.huawei.com/repo/'} } dependencies { classpath'com.huawei.agconnect:agcp:1.3.1.300' } } -
Add the following compilation dependencies to the application-level build.gradle
apply plugin:'com.huawei.agconnect' dependencies { //Do not delete other existing dependencies implementation'com.huawei.hms:push:4.0.2.300' } -
The HMSPushHelper in the demo encapsulates the code for Huawei to apply for the token, you can refer to the implementation
-
Need to inherit HmsMessageService, rewrite onNewToken, upload and push token in it, please refer to HMSPushService in the demo, and configure it in the list file
 <!--Huawei HMS Config-->
         <service android:name=".service.HMSPushService"
             android:exported="false">
             <intent-filter>
                 <action android:name="com.huawei.push.action.MESSAGING_EVENT" />
             </intent-filter>
         </service>
 <!-- huawei push end -->
Note: Our default push copy will be intelligently classified as general. What the APP receives is a silent notification. You need to set a custom push title and content for the message. For specific classification criteria, please consult Huawei’s official website.
Xiaomi Push Integration
Xiaomi Push needs to import the jar package pushed by Xiaomi on the Android side. Add the permissions and configurations related to Xiaomi in the AndroidManifest.xml. And please refer to the Android API document to set the appid and appkey pushed by Xiaomi. For more details, please refer to Xiaomi official documents.
For server-side certificate configuration, please use the developer console.
Meizu Push Integration
Meizu Push includes these two push types: Flyme push and integrated push. The difference between the two is: Flyme push is Meizu’s own push; except for Meizu’s Flyme push, integrated push can also be configured to integrate third-party push such as Xiaomi and Huawei. Chat SDK uses Flyme push reference document
Create Meizu App
The first is to go to the Meizu developer background to create an application and turn on push Service, and upload the corresponding certificate fingerprint. For details, please refer to the official introduction of Meizu: Flyme Push Service Integration
Upload push certificate
After the registration is complete, you need to upload the push certificate in Developer Console, select your application —>Push certificate—>Meizu—>New certificate , And then enter the APP ID and APP SECRET of the application you created in flyme push platform and the of the program Package name;
Access process
-
Add dependency in app level/build.gradle:
dependencies{ // The aar is hosted in jcenter, please make sure that the jcenter repository has been configured for the current project. implementation'com.meizu.flyme.internet:push-internal:3.7.0@aar' } -
Add under the manifest tag of AndroidManifest.xml:
<!-- Meizu push configuration start--> <!-- Compatible with versions below flyme5.0, Meizu's internal integration pushSDK is required, otherwise you cannot receive the message --> <uses-permission android:name="com.meizu.flyme.push.permission.RECEIVE" /> <permission android:name="${applicationId}.push.permission.MESSAGE" android:protectionLevel="signature" /> <uses-permission android:name="${applicationId}.push.permission.MESSAGE" /> <!-- Compatible with flyme3.0 configuration permissions --> <uses-permission android:name="com.meizu.c2dm.permission.RECEIVE" /> <permission android:name="${applicationId}.permission.C2D_MESSAGE" android:protectionLevel="signature" /> <uses-permission android:name="${applicationId}.permission.C2D_MESSAGE" /> <!-- Meizu push configuration end--> -
Add under the application tag of AndroidManifest.xml:
<!-- MEIZU push configuration start --> <receiver android:name="io.agora.push.platform.meizu.MzMsgReceiver"> <intent-filter> <!-- Receive push message --> <action android:name="com.meizu.flyme.push.intent.MESSAGE" /> <!-- Receive register message --> <action android:name="com.meizu.flyme.push.intent.REGISTER.FEEDBACK" /> <!-- Receive unregister message --> <action android:name="com.meizu.flyme.push.intent.UNREGISTER.FEEDBACK"/> <!-- Compatible with low version Flyme3 push service configuration --> <action android:name="com.meizu.c2dm.intent.REGISTRATION" /> <action android:name="com.meizu.c2dm.intent.RECEIVE" /> <category android:name="${applicationId}"></category> </intent-filter> </receiver> <!-- MEIZU push configuration end --> -
Enable Meizu push:
 PushConfig.Builder builder = new PushConfig.Builder(context);
 builder.enableMeiZuPush(String appId,String appKey);
 options.setPushConfig(builder.build());
Pay attention to replace the APP ID and APP KEY above with the content applied by the developer.
Note: If the developer integrates Meizu Flyme push and implements MzPushMessageReceiver, please replace the parent class with MzMsgReceiver provided by chat SDK. Developers please determine the business logic by themselves. If the business logic is not owned by the developer, please pass it to the chat SDK for processing through the super method.
OPPO Push Integration
Create OPPO App
The first is to go to the OPPO developer background to create an application and turn on push Service, and upload the corresponding certificate fingerprint. For details, please refer to the official introduction of OPPO: OPPO Push Service Integration
Upload push certificate
After the registration is complete, you need to upload the push certificate in Developer Console, select your application—>Push certificate—>OPPO—>New certificate , And then enter your OPPO
Developer console the appkey and mastersecret of the application created and the package name of the program;
Access process
If Google FCM push is also configured, please also replace the package_name field in google-services.json. The OPPO device does not open the permission to allow notifications by default after installing the application. Before testing, please go to the settings to open the notification permission of the application. OPPO Push Official Document
-
Configure the OPPO push jar package: Go to the OPPO push official website to download the push SDK package, put the jar package in the libs directory and sync. You can also directly use jar package pushed by OPPO which is integrated in Agora Android chat Demo
-
Add under the manifest tag of AndroidManifest.xml:
<!-- OPPO push configuration start --> <uses-permission android:name="com.coloros.mcs.permission.RECIEVE_MCS_MESSAGE"/> <uses-permission android:name="com.heytap.mcs.permission.RECIEVE_MCS_MESSAGE"/> <!-- OPPO push configuration end --> -
Add under the application tag of AndroidManifest.xml:
<!-- OPPO push configuration start --> <service android:name="com.heytap.mcssdk.PushService" android:permission="com.coloros.mcs.permission.SEND_MCS_MESSAGE"> <intent-filter> <action android:name="com.coloros.mcs.action.RECEIVE_MCS_MESSAGE"/> </intent-filter> </service> <service android:name="com.heytap.mcssdk.AppPushService" android:permission="com.heytap.mcs.permission.SEND_MCS_MESSAGE"> <intent-filter> <action android:name="com.heytap.mcs.action.RECEIVE_MCS_MESSAGE"/> </intent-filter> </service> <!-- OPPO push configuration end --> -
Enable OPPO push:
 PushConfig.Builder builder = new PushConfig.Builder(context);
 builder.enableOppoPush(String appKey,String appSecret);
 options.setPushConfig(builder.build());
Pay attention to replace the APP KEY and APP SECRET above with the content applied by the developer.
VIVO Push Integration
Create VIVO application
The first is to go to the VIVO developer background to create an application and turn on push Service, and upload the corresponding certificate fingerprint. For details, please refer to the official introduction of VIVO: VIVO Push Service Integration
Upload push certificate
After the registration is complete, you need to upload the push certificate in Developer Console, select your application—>Push Certificate—>VIVO—>Add Certificate , And then enter the APP ID, APP KEY and APP SECRET of the application you created in VIVO Developer Console and the of the program Package name;
Access process
The VIVO device does not have the notification permission enabled by default after the application is installed. Please go to the settings to open the notification permission of the application before testing. VIVO Push Official Document
-
Configure VIVO push jar package: Go to the VIVO push official website to download the push SDK package, put the jar package in the libs directory and sync. You can also directly use the jar package pushed by VIVO integrated in Agora Android chat Demo.
-
Add under the application tag of AndroidManifest.xml:
<!-- VIVO push configuration start --> <service android:name="com.vivo.push.sdk.service.CommandClientService" android:exported="true" /> <activity android:name="com.vivo.push.sdk.LinkProxyClientActivity" android:exported="false" android:screenOrientation="portrait" android:theme="@android:style/Theme.Translucent.NoTitleBar" /> <!--Push configuration--> <meta-data android:name="com.vivo.push.api_key" android:value="appKey applied by the developer" /> <meta-data android:name="com.vivo.push.app_id" android:value="appId applied by the developer" /> <receiver android:name="io.agora.push.platform.vivo.VivoMsgReceiver"> <intent-filter> <!-- Receive push message --> <action android:name="com.vivo.pushclient.action.RECEIVE" /> </intent-filter> </receiver> <!-- VIVO push configuration end --> -
Enable VIVO push:
 PushConfig.Builder builder = new PushConfig.Builder(context);
 builder.enableVivoPush();
 options.setPushConfig(builder.build());
Note: If the developer integrates VIVO push and implements OpenClientPushMessageReceiver. Please replace the parent class with VivoMsgReceiver provided by chat SDK. Developers should determine the business logic by themselves. If the business logic is not owned by the developer, please pass it to the chat SDK for processing through the super method.
Unbind token
When using third-party push, you need to unbind the device token when you log out, and call the ChatClient#getInstance()#logout(true) or ChatClient#getInstance()#logout(true,callback) method. If it is kicked, the requirement is set to
false.
Push configuration options
Users can add specific fields to the message extension to implement message push configuration.
Send silent message (not push)
ChatMessage message = ChatMessage.createSendMessage(ChatMessage.Type.TXT);
TextMessageBody txtBody = new TextMessageBody("test");
message.setTo("6006");
// Set custom extension fields
message.setAttribute("em_ignore_notification", true);
// Set the message callback
message.setMessageStatusCallback(new CallBack() {...});
// Send a message
ChatClient.getInstance().chatManager().sendMessage(message);
forced to push
ChatMessage message = ChatMessage.createSendMessage(ChatMessage.Type.TXT);
TextMessageBody txtBody = new TextMessageBody("test");
message.setTo("6006");
// Set custom extension fields
message.setAttribute("em_force_notification", true);
// Set the message callback
message.setMessageStatusCallback(new CallBack() {...});
// Send a message
ChatClient.getInstance().chatManager().sendMessage(message);
Custom push notification
// Here is just a TXT message as an example, the setting methods of IMAGE FILE and other types of messages are the same
ChatMessage message = ChatMessage.createSendMessage(ChatMessage.Type.TXT);
TextMessageBody txtBody = new TextMessageBody("Message Content");
message.setTo("6006");
// Set custom push notification
JSONObject extObject = new JSONObject();
try {
    extObject.put("em_push_name", "Offline Push Title");
    extObject.put("em_push_content", "Offline Push Content Part");
} catch (JSONException e) {
    e.printStackTrace();
}
// Set the push extension to the message
message.setAttribute("em_apns_ext", extObject);
// Set the message callback
message.setMessageStatusCallback(new CallBack() {...});
// Send a message
ChatClient.getInstance().chatManager().sendMessage(message);